

A part from SharePoint out of the box features, developers may have requirments from clients which needs some extra efforts. As the title of this post explains the main objective, so I will be focusing on showing how to do this.
Just to give a backgroud Web Parts for List or Libraries in SharePoint 2010 can be easily used and edited within browsers. One can easily change properties like selecting a different view to be shown in Web Part. The only problem in doing so is that you have to edit the page and then edit the web part each time you need to change or select the list view. This is a bit difficult for end users. So, You need to enable an option for the users to select different view within web part without editing it. To cater this issue you need to write custom webpart and then deploy it to your sharepoint site. Following is the step by step tutorial to do it.
1. Creating Web Part in Visual Studio.
To create list webpart open visual studio. Click on New --> Project, Select SharePoint from Installed templates and then select Visual Web Parts. Enter name and location and click ok.

From SharePoint Customization specify your SharePoint site and select Deply as a farm solution option and click Finish.

After project is created perform following step.
- In solution explorer expand VisualWebPart1 node and double click on VisualWebPartUserControl.acsx.
- Click on Source tab add add following lines.
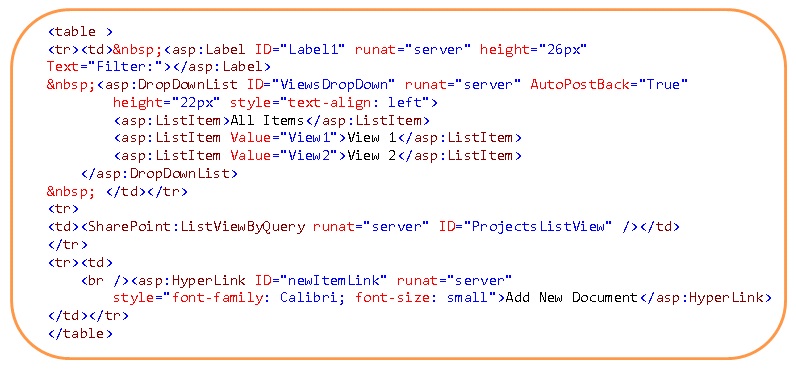
- Repalce the values of dropdown with your list views name.
- Switch to design tab, right click and select View Code option.
- Add following namespaces if not there.
- using Microsoft.SharePoint;
- using Microsoft.SharePoint.Utilities;
- using System.Web;
- Add following code in Page_Load method and replace "Shared Docments" with your list name.

- In Solution Explorer expand VisualWebPart1 and double click on Element.xml and change the value of property tag to "MYWebParts". This value is used as a category of webparts on your site.
- In Solution Explorer expand VisualWebPart1 and double click on VisualWebPart1.webpart and replace the Title and Description in properties tag. This is your webpart title which can be changed later on your site.
- Click on Build --> Build Solution.
- Finally Click on Build --> Deploy Solution. Wait untill you see "deploy succeed" message on bottom left of the screen.
Thats it! now after all above steps your custom web part has been created and deployed on your sharepoint site. All you need now, is to drop it on your SharePoint site page.
2. Adding Custom WebPart to SharePoint site page.
To add your custom web part to SharePoint site page perform following step
- Open SharePoint site page and click Edit icon on top
- Select zone of the page where you want to add your WebPart
- On Ribbon above select Insert Tab and click on WebPart
- In Categories select "MYWebParts"
- In Web Parts Select your web part
- Click Add and your your web part will be droped at that location.
I Hope this post will help those who are new to SharePoint. Kindly give your comments below if you are stuck at any step above. I need comments so that I can post more stuff related to SharePoint
Thank you so much..................................................................
ReplyDelete